
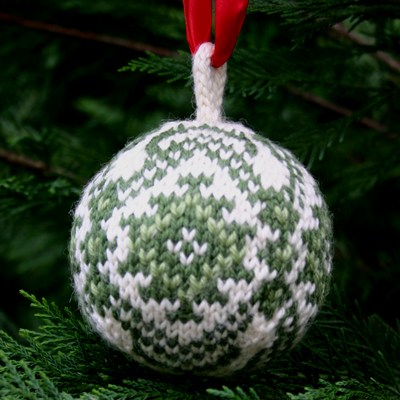
When I wrote my “Christmas Balls” free knitting patterns last year (and my free “Star of Bethlehem” pattern this year) I had my “typical” knitting customer in mind. Not that any of you are typical – you’re all special and wonderful! But, since I specialize in yarns that work especially well with Norwegian and Fair Isle knitting, many of the people who seek me out are already pretty familiar with those techniques – some are truly world-class experts! Nonetheless, I’m happy to report that the irresistible call of my favorite four-letter word, F-R-E-E, apparently works wonders to inspire newcomers to take up Norwegian & / or Fair Isle knitting, too. I’ve gotten quite a few emails from folks who want to try the Christmas Balls out, but have never knit circularly, or have never followed a colorwork chart. I’m adding my response to their most common questions here, below. It’s not a comprehensive class in circular knitting – just a walk-through for the first several rounds of the “Kilim” ball – but I’m hoping it will work well to entice more first-time stranded knitters into the fold. If you’re already familiar with circular knitting, please pass it along to friends that you’d like to share some stranded knitting love with. If it’s all new to you, give it a try and feel free to post your questions / comments here. Have fun!

Page Three from my “Christmas Balls” free knitting pattern PDF.
This link, http://www.knittinghelp.com/videos/advanced-techniques , takes you to a few videos for various ways to knit in the round. Scroll down the page to their “Small Diameter Circular Knitting” videos to view the 3 methods they describe, all of which will work with the Christmas Balls. Although they indicate that double-pointed needles are the “most common” way to knit circularly, I’d say that’s rapidly changing; dpns are the traditional way, but if they did a survey today, I wouldn’t be at all surprised if “magic loop” were to win the “most popular” way prize.
Each Christmas Ball has 4 panels, with each panel consisting of one instance of the chart. You start by knitting on the lowest row, at the far right (don’t forget that 1st column, off to the right!) always reading right to left, knitting the color shown for each stitch and stranding the unused color behind your work. I’ll give you row-by-row instructions for the first few rows of the Kilim ball, then I think you’ll catch on:
Round 1: Simple! Three k sts in white (A), repeated 4 times = K 12 sts in A. (At the end of the 4th repeat of each chart row, don’t turn your work, just keep knitting around in the same clockwise direction, as shown in the videos, and begin reading the next chart row from right to left.)
Round 2: * K 3, M1, repeat from * 3 more times (i.e., to the end of the round, which will give you 4 repeats in all, with all stitches still using white. See chart legend for “M” description. Since you’ve added one stitch to each of the 4 panels, you’ve gone from 12 sts to 16 sts.)
Round 3: Same idea as Round 1, although it’s now K 4 x 4 = 16 sts in A.
Round 4: * K 1 in A, m 1 in A, K 1 in A, K 1 in B, K 1 in A, M 1 in A, repeat from * to end of round. * (Now you’re adding 2 sts to each of the 4 panels – 1 m, 1 M – so your stitch count goes from 16 to 16 + (2 x 4) = 24.)
Round 5: * K 2 in A, K 3 in B, K 1 in A, repeat from * to end of round.
I think that should help. Give it a try. Have fun!


Pingback: 10 Free Last Minute Knit Gift Ideas - Amanda Saladin