
A few knitters have asked me lately how I finish a knitted hem. I just came across the above old photo and thought it might be useful in answering that question.
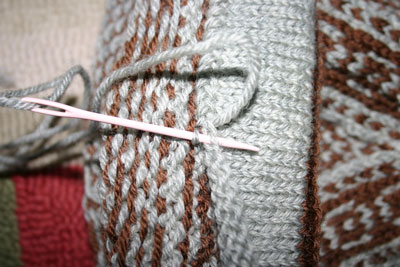
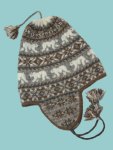
This photo shows how I slipstitch the hem inside my hats. After I cast on and join my work circularly, I knit a couple of inches for the inside hem. Then I purl 1 round to create a foldline. (You’ll see a brown purled foldline to the right of the mostly solid grey hem.) Right after I purl the foldline, I change to a larger needle size. By using the smaller size on the inside, I know I’ll create a smaller concentric circle for my hem and that it will sit nicely inside the hat without pushing on the outside and making the bottom of the hat flare unnecessarily.
Rather than changing needle sizes, some folks might choose to stick to one needle size and increase several stitches immediately before or after the purl foldline to get the same nested circle effect. That can certainly work, but I prefer avoiding potentially unsightly increases which can rumple my foldline. I let the needle change do all the work for me on the sly. Just how different my needle sizes would be depends upon just how different the nested circles must be. For example, with heavier gauge yarn, we need more of a difference, so the needles might differ by two, even three sizes (for the really bulky stuff); for fingering weight yarn, one size difference will do.
Once I’ve worked the entire outside of my hat, I’m ready to slipstitch the hem in place. I started by tucking the hem inside, right on the purl stitch foldline. Once I’ve figured out just which round of knitting on the outside is the same distance from the foldline as the cast-on edge, one loop from each stitch on the cast-on edge (solid grey) gets joined with the purl bump from the same stitch column on the inside of the hat. It’s well worth double checking that the purl bump you’re scooping up is indeed from the same stitch column as your cast-on stitch – otherwise, your hem will be skewed. (Yeah, ask how I know! 😉 ) If you carefully match the first stitch you hem, you’ll be set for the whole round. Loosely join a few consecutive stitches, then snug up the tension, checking the right side of the work to make sure that you’re not pulling so tightly that you create a demarkation line.
I don’t really enjoy hemming on any sort of fiber. It’s not creative; it’s drudgery at best. Back in my days as a corporate slave, the scotch tape dispenser on my desk was probably accessed as often for hemming as for any legitimate office purpose. Same with the stapler. Of course, anything I knit is far more important to me than any old corporate get-up, so I don’t skimp when it comes to knitted hems. It’s well worth taking care to join every single stitch in the knitted hem. Short cuts on hems show up badly. (Okay, maybe not as badly as staples and scotch tape, but forget the shortcuts and you’ll be happier in the long run.)
I know some people like to knit their hems in place as they go by knitting stitches from the cast-on edge together with those from the equidistant round on the outside as soon as that round is encountered. No doubt, there are some folks who have perfected that method. But from what I’ve seen and what I’ve tried, that method is more apt to lead to a tight ridge that can show up unattractively. It’s easier to adjust the tension a few stitches at a time with this hand sewn method you see above. Especially on hats, a tight ridge squeezing around our heads is probably the last thing we need. Ouch! Give this slipstitched hem a try and tell us how it goes!


Thanks for such a great post – I love it when knitters share!