
 Knitting patterns start with the presumption that we will all follow every direction to a “T”. Experience teaches us that none of us is perfect, and, no matter the skill level, we will all eventually make some mistakes. Furthermore, it seems there is some perverse law of Nature that dictates that a fair amount of those mistakes will go entirely unnoticed in the making, yet they will become glaring blunders right about the time we think we’re done.
Certainly, none of us relishes the idea of unraveling most of our beautiful work just to get back to our old missteps. But as we bind off the last stitches, hold up our masterpieces for inspection and feel our hearts sink, is it really time for the Hefty bag? Not so fast! Grafting to the rescue!
Grafting (aka kitchener stitch) is often used for joining shoulders invisibly. It’s also the preferred method for joining the bottom of raglan sleeves to sweater bodies. Most knitters familiar with grafting learned the technique by following patterns with one or both of those applications. However, the most valuable use of grafting may be the one no pattern will ever recommend: rescue from the dreaded Hefty bag.
Having heard far too many stories of 99% gorgeous creations being banished to the purgatory of a Hefty bag, I’ve decided to share a lesson on grafting that will hopefully inspire some of you to rescue, perfect and proudly wear those hidden near-masterpieces. The steps below show you how to use grafting to repair isolated areas within one row of knitting without having to rip out any extra rows of stitches. Many of those previously-invisible-but-now-glaring mistakes can be essentially erased this way. You can also use the same technique to insert or delete rows to repair, lengthen or shorten your work and then rejoin it, effectively splicing your work and editing it to your taste, without undoing any of the good parts. Phew!!!
Note: In hope of showing a visually- friendly example, I searched my stash for the closest thing I had to solid-colored (yawn) knitting. I used red, contrasting yarn so that you’d easily see what was done, but of course, I suggest you use matching yarn. The “mistake” in these steps is imaginary; the stripes are irrelevant. But don’t worry, I have plenty of bona fide blunders to share with you – see bottom!
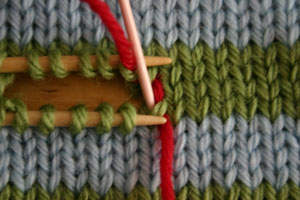
Find a well-lit table and spread your work out flat. For mistakes isolated within one row, pick up every stitch in the rows immediately above and below the row you intend to repair. The problematic row lies untouched, in the middle. Pick up the stitches by inserting the tip of your needle under just the right side of each stitch’s “V”.

In the steps below, notice that the work is done between the 2 knitting needles – not below the lower one, nor above the upper one.
Carefully snip a stitch in the middle of your problematic row. Unravel as many stitches within that row as needed to “erase” your mistake, leaving enough yarn length on each side for weaving in later.

Grafting Step #1: Thread a blunt yarn sewing needle (SN) with your yarn. Insert SN right-to-left through the first stitch on the lower knitting needle. Let that stitch slide off your knitting needle, then pull SN and the grafting yarn through that stitch, leaving a couple of inches of tail to be woven in later.

Grafting Step #2: Bring SN up and insert it right-to-left through the first stitch on the upper knitting needle. Let that stitch slide off the upper knitting needle and onto SN. Pull yarn through loosely. (If the next stitch on the upper knitting needle is a different color than the one you just pulled through, see notes on stranded grafting, at the very bottom. Otherwise, go to Grafting Step #3.)

Grafting Step #3: Insert SN left-to-right through the next stitch on the upper knitting needle. Pull yarn through loosely. Let that stitch stay where it is on the upper knitting needle.

Insert SN front-to-back through exactly the same spot the grafting yarn came out of in Step #1.
Okay, let’s see that again! Here’s Step #1 again. Remember, once we scoop up that first stitch, we take it off the lower knitting needle.

Here’s Step #2 again. We’ll take that stitch off the needle, too.

In Step #3, it’s important that we remember to insert SN from the left to the right and pull our yarn through but still leave it on the upper knitting needle.

Now here’s Step #4. See, SN is going from the front to the back, right into the middle of that stitch we had dropped off the lower knitting needle in Step One.

1,2,3,4,1,2,3,4,1,2,3,4…ta-da!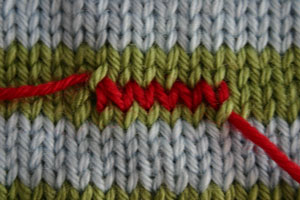
As you can see below, I really am woefully familiar with that heart-sinking feeling at final inspection. “Oops” was easily remedied with 1 row of duplicate stitch – a small price to pay for knitting in poor lighting and selecting the wrong color for 1 row. But, “yikes” shows a real head-banging blunder: three rounds entirely forgotten. Doh!
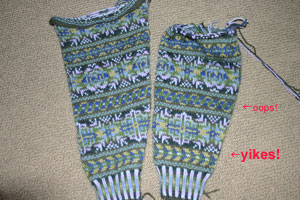
These sleeves were a fair amount of work and I really did not want to frog the second one. I decided to use long circular needles to pick up each entire round immediately above and below the point of the missing rounds, leaving one round in between for cutting. I snipped the sleeve open all the way around. On the bottom half, I reknit the cut row. Then, I knit the 3 missing rows. Finally, I grafted the new & improved bottom back on using the above technique, keeping in mind the special consideration for stranded knitting mentioned below. Fortunately, the 3 missing rows were not affected by increases. (Regrettably, splicing and shaping don’t mix.) As you might imagine, you can use this technique to shorten or lengthen all sorts of work, as long as there is no shaping within the spliced section.
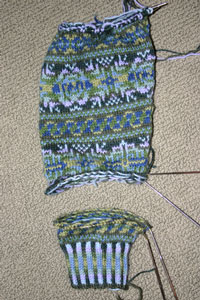
In a case like this, where we want to pick up the entire circumference, it pays to use extra long circular needles that can be looped back on themselves. If you do this with double-pointed needles, you might want to secure the ends with rubber bands or some other sort of stopper.

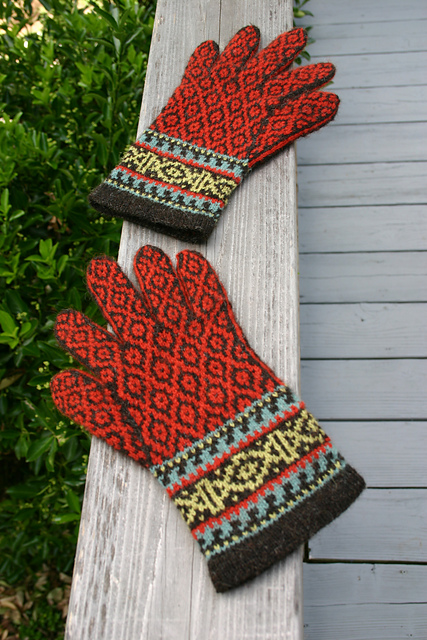
Special consideration for any stranded grafting: Look closely at the photos on the simple striped swatch, at top. Notice that the work on the bottom needle joins the adjacent sides of two different stitches and the work on the top needle joins the two sides of one single stitch. Since you’re dealing with two different stitches on the bottom (in Step #4, then the following Step #1) you may or may not encounter different colors, depending upon your Fair Isle patterning. In any case, it really won’t matter for the bottom needle – Steps #4 and #1 for Fair Isle grafting are worked in exactly the same manner as in the above example. Since both elements joined at the top (i.e., Step #2, then Step #3) form one single stitch, they should always be the same color. With Fair Isle grafting, after you’ve done Step #2, the next stitch on the upper knitting needle may be a different color. Well, that just won’t do! If the loop for Step #3 is a different color than that for Step #2, once you’ve slid off your Step #2 stitch, notice that its other half has become a strand/float going to the left behind that differently-colored Step #3 stitch. Forget about that different-colored stitch we’d normally use and pick up the same-colored left side that becomes a strand/float. Now you can proceed with Step #4 as above.


Mary Ann – that is the absolute best explaination I’ve ever seen of Kitchner stitch. Thank you so much for taking all the time to write it up and add the photos.
To echo the comment above, this is a great photo essay. thank you
I am from Norway but live in Seattle ( Kirkland). I have been knitting all my life. I knitt everything and my family and friends have Nowegian sweathers. I knitt a sweather in 2 weeks. I am so happy i can get Dale and Rana yearn here. I get all my patterns from Norway because i like to knitt in Norwegian. My father are sending it to me
Like your blog
Anita
Mary Ann,
I appreciate your expirence work, firstly. All the time that you put into this photo workshop, is better then wonderful. This just shows more than techinque but your generosity and love. Love and hugs, to you for all this help. Another Knitting Treasure is who you are.
Thank-you,
Cheryl Virginia
Hi
Beautiful knitting! I have a goal, that is to learn to knit me a pair of fair isle socks in 2008 (I think;-))
Dear Mary Ann,
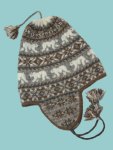
You did a wonderful job on your explanation! What a good teacher! Now when following your post i fell in love with the Fair Isle Pattern you show. Where is that? Is it your own design?
Andrae
Hi Andrea!
Thanks so much, that’s nice to hear! Yes, that’s my design, my knitting.
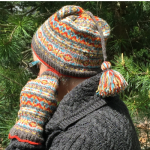
When I has about two-thirds of the way through that sweater, I found out that many of the colors I was using were suddenly discontinued by Dale of Norway as they revamped their Heilo palette. (This was a few years ago.) I had been planning on publishing the pattern for that sweater, but alas, it seems unlikely now. If just one or two of the colors had been discontinued, maybe I could have come up with substitutes and used the original as the model. But, with the majority of them gone, I’d have to knit it up in another colorway before I could offer it to others.
Have you ever suffered from “second sock syndrome”or “second mitten syndrome” – that overwhelming sense of tedium that can foul our thoughts of duplicating work that was a delight the first time around; that nagging distaste for repetition that can keep us from casting on for the mate? Well, I have “second sweater syndrome”.
Despite the dreaded syndrome, some parts of that sweater have been given a second chance. Look closely at the photos on my post for my Chrysanthemum mittens and you’ll see one of the motifs from this ill-fated sweater. If you visit my main site, Kidsknits.com. , you can see my Amaryllis mittens, which borrowed a bit from this sweater, too. I doubt I’ll ever be able to bear exactly reproducing this sweater, but I think there are at least a dozen more derivative designs yet to come out of it.
Mary Ann
Mary Ann, this is very well described steps to fix the error in knitting , thank you so much.
Thank you for these instructions. I was delighted to discover I did not need to frog back 42 rows to insert the omitted 8 rows. One additional question: Can the above the error piece be knitted on its bottom to lengthen it before doing the grafting stitches to the newly added rows?
While it would be possible to pick up stitches and knit down from the section above your error, it might not always be advisable. Stitches worked in an opposite direction will be shifted by a half-stitch horizontally.